
Introduction
Embarking on the culinary adventure of making fried ice cream is like unlocking a delightful secret of the dessert world. This exquisite treat, with its surprising contrast of hot and cold, crispy and creamy, has captivated the taste buds of many. Whether it’s a festive occasion like Cinco de Mayo or a cozy night in, learning how to make fried ice cream is a skill that will surely impress. The process may seem daunting at first, but with the right ingredients and a step-by-step guide, you’ll find it’s a fun and rewarding dessert to create.
While the exact origins of fried ice cream are shrouded in mystery, its popularity in American Mexican restaurants and beyond is undeniable. The key to perfecting this dessert lies in the preparation stages, which involve forming ice cream into balls, coating them meticulously, and achieving that golden, crispy exterior through a quick fry.
The result is a dessert that’s not just a treat for the palate but also a spectacle for the eyes, often eliciting ‘ooh’s and ‘aah’s from those eagerly awaiting a taste. So, let’s dive into the process and ensure your fried ice cream is the highlight of any dining experience.
Ingredients for fried ice cream

Ice cream
The cornerstone of this indulgent dessert is, of course, the ice cream. While vanilla ice cream is a classic choice, offering a neutral base that complements the crispy coating, don’t hesitate to experiment with other flavors to tailor the treat to your liking.
Whether you opt for a rich, homemade Mexican chocolate ice cream or a refreshing mint chip, the key is to ensure your ice cream is deeply frozen.
This is crucial for maintaining its shape and creaminess when it hits the hot oil. As recommended by Amanda’s Cookin’, the ice cream balls should be large enough to withstand the frying process without melting away before the shell crisps up.
Remember to keep the ice cream in the freezer between steps, as this will be the secret to your success in creating the perfect fried ice cream.
When scooping your ice cream, aim for generous portions, typically a little more than a ½ cup in size, to ensure they can endure the brief but intense frying.
After scooping, the ice cream balls need to be placed back in the freezer to harden, as noted in the detailed instructions from Brown Eyed Baker.
This step is not to be rushed; patience here pays off in the form of a dessert that delivers that sought-after crunch followed by a melt-in-your-mouth center. So, choose your favorite ice cream flavor and prepare for a bit of a wait as you set the stage for fried ice cream perfection.
Cornflakes or bread crumbs
The choice between cornflakes and bread crumbs is a defining one in the quest for the quintessential fried ice cream texture. Cornflakes are the traditional go-to for their ability to deliver a satisfying crunch that’s hard to replicate.
They are crushed into fine pieces, often mixed with a hint of cinnamon and sugar to enhance the flavor profile, as suggested by Amanda’s Cookin’. Bread crumbs, on the other hand, can be used as an alternative, offering a different kind of crispy texture.
Whichever you choose, the coating must be fine enough to adhere to the ice cream but coarse enough to provide that signature crunch that makes fried ice cream so irresistible.
For those who prefer a more nuanced flavor or texture, consider mixing in additional ingredients such as sweetened shredded coconut or chopped pecans, as recommended by Cooking Classy. This not only adds depth to the taste but also introduces a delightful variety to the crunch with each bite.
Remember, the coating is not just a barrier to the heat; it’s an integral part of the fried ice cream experience, contributing to both the flavor and the overall sensory delight of this unique dessert.
Eggs
Moving on to another essential ingredient, eggs play a pivotal role in the fried ice cream assembly process. They act as the glue that binds the crunchy coating to the ice cream.
Whisked to frothy perfection, the egg whites create a sticky surface on the ice cream balls, ensuring that the cornflake or breadcrumb mixture adheres well. This step cannot be overlooked, as it is critical for achieving that perfect crispy shell upon frying.
As per the instructions from Amanda’s Cookin’, the egg whites should be beaten until foamy before the ice cream balls are dipped in, guaranteeing a uniform and secure coating.
It’s important to use fresh eggs and to whisk them just before you’re ready to coat the ice cream balls to maintain the integrity of the egg whites. This will ensure that the coating sticks effectively, preventing any ice cream from leaking out during the frying process.
The eggs not only contribute to the structural aspect of the dessert but also add a subtle richness to the coating, complementing the sweet and creamy interior. So, crack those eggs and get ready to dip and roll your way to fried ice cream success.
Oil for frying
Choosing the right oil for frying is crucial to the success of your fried ice cream. A neutral oil with a high smoke point, such as vegetable or canola oil, is ideal for achieving that golden, crispy exterior without imparting any unwanted flavors.
The oil needs to be heated to precisely 375°F, a temperature that allows the ice cream to fry quickly without melting, as highlighted by Cookies and Cups. Monitoring the oil’s temperature is key; too hot, and the coating may crack, too cool, and the ice cream could absorb the oil and become soggy.
When it comes to frying, depth is also a factor. A large Dutch oven or deep fryer should be filled at least 4 inches deep with oil to ensure the ice cream balls are completely submerged for an even fry.
This technique results in a warm, crunchy shell encasing the still-cold ice cream, creating a delightful contrast in temperatures and textures.
Remember to keep the ice cream in the freezer right up until the moment it’s plunged into the hot oil to maintain its shape and consistency during frying.
Preparing the ice cream balls
Scooping the ice cream
The first step in preparing the ice cream balls is to scoop out the perfect portions. For a smooth process, run your ice cream scoop under hot water to easily glide through the cold dessert.
An ice cream scoop is ideal for creating uniform balls, but if you don’t have one, you can shape spoonfuls of ice cream with your hands.
To prevent the ice cream from melting too quickly, consider wearing gloves, as suggested by House of Nash Eats. This will keep the warmth of your hands at bay and ensure your ice cream balls are as round and firm as possible.
Once scooped, the ice cream balls need to be frozen until they are solid. This step is crucial; as Preppy Kitchen advises, rushing the freezing time could result in the ice cream melting when it hits the hot oil.
Place the scoops on a parchment-lined tray and freeze for the recommended time to ensure they maintain their shape during the coating and frying stages. Patience here will pay off with perfectly fried ice cream later.
Freezing the ice cream balls
After scooping, the ice cream balls must be transferred to a baking sheet lined with parchment paper and placed in the freezer. This step is essential to harden the ice cream thoroughly, making it resilient enough to withstand the subsequent coating and frying processes.
As per the guidance from House of Nash Eats, the balls should be frozen until they are very solid, typically requiring about three hours. This ensures that the ice cream doesn’t soften too much during the coating stage, which could compromise the final texture of the fried ice cream.
It’s important to space the ice cream balls evenly on the tray to prevent them from sticking together and to allow for even freezing. Once solid, they’re ready for the next step: the coating process.
A well-frozen ice cream ball is the secret to a successful fried ice cream, as it provides a stable base for the crunchy outer layer and helps maintain the cold center when fried, delivering that signature hot-and-cold sensation that makes this dessert so unique.
Coating the ice cream balls
Dipping in egg mixture
With the ice cream balls sufficiently frozen, it’s time to prepare them for their crunchy exterior. Begin by whisking together eggs, sugar, and a splash of milk in a shallow bowl, creating a sweet and sticky mixture that will act as the glue for the coating.
As recommended by Brown Eyed Baker, each ice cream ball should be rolled in the egg mixture to ensure an even coat. This step is not to be rushed; a thorough coating is key to achieving the perfect fried ice cream.
Immediately after the egg wash, while the mixture is still wet, roll the ice cream balls in your chosen coating of crushed cornflakes or breadcrumbs, as detailed by Amanda’s Cookin’.
This double-dipping technique is crucial for creating a thick barrier that will protect the ice cream from the hot oil. Ensure each ball is covered generously, pressing the coating in firmly to adhere well.
Once coated, the ice cream balls should be placed back in the freezer to set the coating and to firm up again before frying, ensuring they hold their shape and texture.
Coating with cornflakes or bread crumbs
Once the ice cream balls have been dipped in the egg mixture, the next step is to roll them in a crunchy coating. A mixture of crushed cornflakes, cinnamon, and sugar, or alternatively, breadcrumbs, provides the ideal texture for fried ice cream.
The process, as outlined by Cooking Classy, involves thoroughly rolling the sticky ice cream balls in the coating, pressing the cornflakes or breadcrumbs onto the surface to form a thick layer. This not only adds crunch but also acts as an insulating barrier during frying, keeping the ice cream cold and creamy.
For an extra layer of flavor and texture, some recipes suggest adding sweetened shredded coconut or finely chopped pecans to the cornflake mixture. After coating, the ice cream balls require another stint in the freezer to ensure the coating is solidified and the ice cream remains firm.
This step is crucial for maintaining the structural integrity of the dessert when it hits the hot oil, as emphasized by House of Nash Eats. A well-coated and refrozen ice cream ball is the foundation of a perfectly executed fried ice cream, ready to delight with its contrasting temperatures and textures.
Frying the ice cream balls
Heating the oil
With your ice cream balls now well-coated and resting in the freezer, it’s time to focus on the frying process. Begin by pouring a sufficient amount of oil into a deep pot or fryer, ensuring there’s enough depth to completely submerge the ice cream balls.
The oil needs to be heated to the optimal temperature of 375°F, as a consistent and correct temperature is crucial for achieving a golden, crispy exterior without compromising the frozen core of the dessert. Use a deep-fry thermometer to monitor the oil’s temperature, as suggested by Preppy Kitchen, to prevent the coating from cracking and the ice cream from melting into the oil.
Once the oil has reached the desired temperature, maintain the heat at a steady level. It’s important to fry the ice cream balls one at a time to ensure each one cooks evenly and to avoid lowering the temperature of the oil too much, which can result in a soggy coating.
As you prepare to fry, remember to handle the ice cream gently with a large, flat slotted spoon or spider strainer, as this will be key to a successful fry that encapsulates the creamy delight within a perfectly crisp shell.
Frying the coated ice cream balls
Now comes the moment of truth in the journey of how to make fried ice cream: submerging the coated ice cream balls into the hot oil. Carefully place each frozen ball into the oil using a large, flat slotted spoon or spider strainer, ensuring it is completely immersed to cook evenly.
This critical step should last no more than 10 to 15 seconds to prevent the ice cream from melting while achieving that desirable golden crust. As soon as the exterior is crisped to perfection, promptly remove the ice cream from the oil and let it rest on a paper towel to blot away excess grease, as recommended by The Gunny Sack.
After frying, serve the ice cream immediately to savor the delightful contrast of hot and cold or, if needed, place it back in the freezer to firm up before serving. This step ensures that each bite is a harmonious blend of creamy ice cream and crunchy coating.
Remember to fry the ice cream balls individually, taking each one out of the freezer only when you’re ready to fry. This maintains the integrity of the dessert and guarantees a spectacular result that’s sure to impress any dessert aficionado.
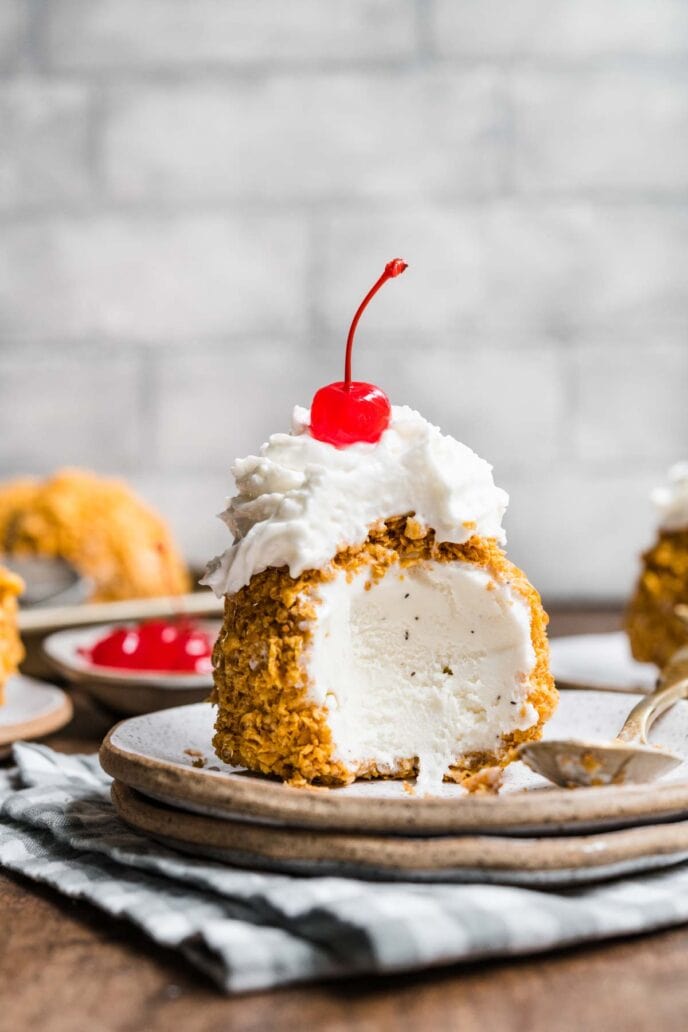
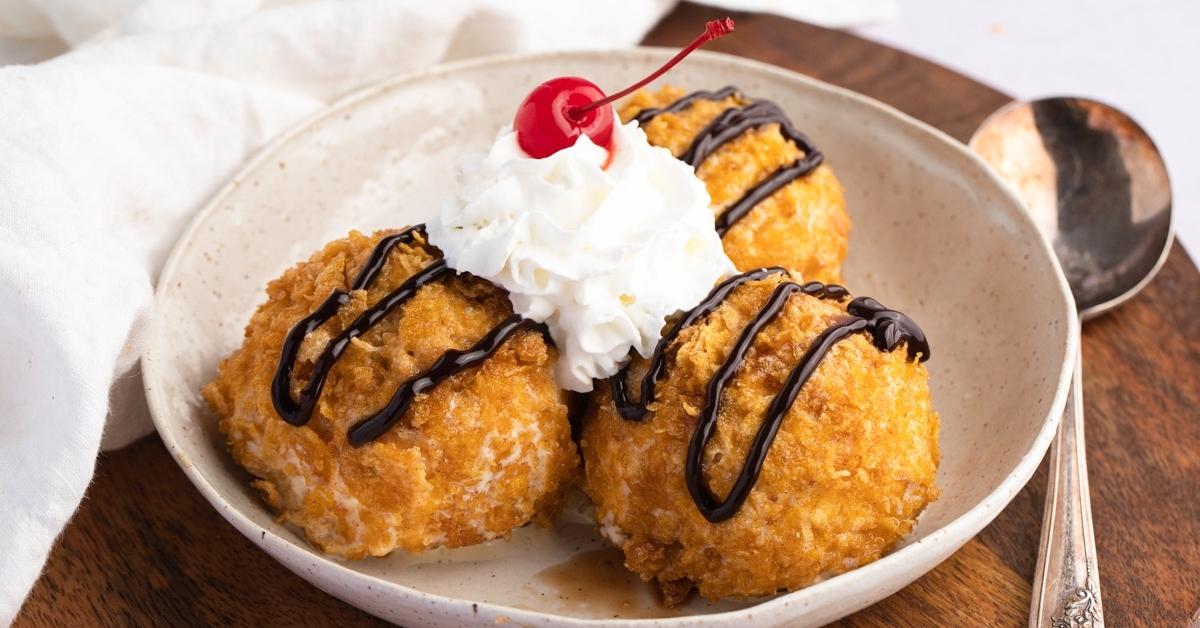
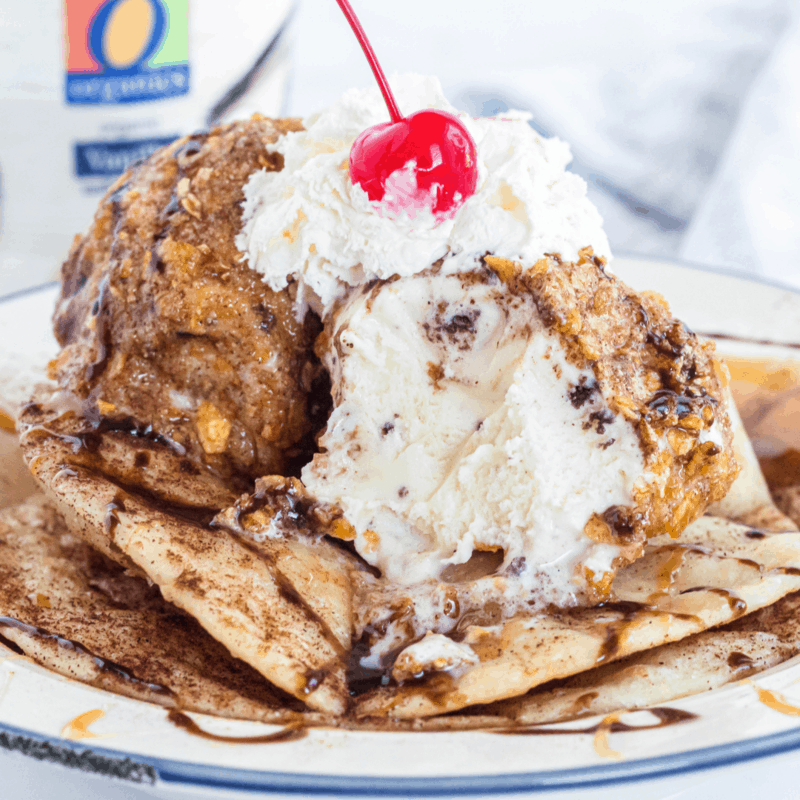
Serving the fried ice cream
Garnishing and serving suggestions
Once your fried ice cream is golden and ready, it’s time to elevate this dessert with the perfect garnishes. A drizzle of chocolate sauce or a dollop of whipped cream can add a luxurious touch, while a sprinkle of cinnamon sugar or a handful of colorful sprinkles bring a festive flair.
For those who adore a fruit element, consider a spoonful of fresh berries or a vibrant maraschino cherry on top. The key is to serve the fried ice cream immediately after garnishing, ensuring the ideal balance of warmth from the crispy shell and the cool, creamy center that makes this dessert so indulgent.
For an extra touch of elegance, present the fried ice cream on a chilled plate and pair it with a side of caramel sauce or honey for dipping. The contrast of temperatures and textures, combined with the sweet and savory notes, creates a truly memorable dessert experience.
Whether you’re serving this at a casual gathering or a more formal event, the versatility of garnishing options ensures that fried ice cream can be tailored to suit any occasion and palate, as highlighted by the variety of serving suggestions from Cookies and Cups.
Conclusion
In mastering the art of how to make fried ice cream, you’ll find that the process is as delightful as the dessert itself. From the initial scooping of the ice cream to the final, satisfying crunch of the golden exterior, each step is crucial in creating this unique treat.
As you serve up this delectable dessert, watch as it becomes the centerpiece of your gathering, eliciting ‘oohs’ and ‘aahs’ from your guests. The combination of a hot, crispy shell and a cold, creamy center is not just a dessert; it’s an experience—one that’s sure to leave a lasting impression.
Whether you’re celebrating a special occasion or simply indulging in a sweet craving, fried ice cream is a showstopper that’s as fun to make as it is to eat. With the right technique and a bit of practice, you’ll be able to whip up this crowd-pleaser with confidence, ensuring that every spoonful is a perfect harmony of textures and temperatures.
So, don your apron, gather your ingredients, and get ready to dazzle your taste buds with this classic, yet always surprising, fried ice cream delight.
Sources:
- https://keepingitrelle.com/fried-ice-cream/
- https://www.browneyedbaker.com/fried-ice-cream/
- https://preppykitchen.com/fried-ice-cream/
- https://www.thegunnysack.com/fried-ice-cream/
- https://www.allrecipes.com/recipe/20988/fried-ice-cream/
- https://www.cookingclassy.com/fried-ice-cream/
- https://houseofnasheats.com/fried-ice-cream/
- https://cookiesandcups.com/fried-ice-cream/
- https://www.quora.com/How-is-fried-ice-cream-made
- https://amandascookin.com/fried-ice-cream/
FAQ
-
What is fried ice cream made of?
The dessert is commonly made by taking a scoop of ice cream frozen well below the temperature at which ice cream is generally kept, possibly coating it in raw egg, rolling it in cornflakes or cookie crumbs, and briefly deep frying it.
-
How do you fry ice cream without melting it?
By sealing hard-set ice cream in a layer of whipped egg whites (or sponge cake batter), followed by an outer layer of crispy cereal, cookies, or tempura-style batter, the ice cream is adequately insulated for a quick fry in hot oil.
-
How come deep fried ice cream doesn’t melt?
Though the process does seem like it would take a little magic, it turns out some simple science is at work. Coating the frozen ball of ice cream with just the right ingredients creates a layer of insulation that protects the ice cream from melting.
-
Is fried ice cream tasty?
Yes, it’s good. It’s ice cream wrapped in what looked like a thin pancake, fried very quickly, so the ice cream inside is still frozen, not melted.


